

- The first step is to cut the word(s) you would like to add to your organizer from vinyl using a craft cutting machine.
- Weed away all excess vinyl from the cut.
- Apply transfer tape to the front then peel away the backing from the letters.
- Carefully add the words to your sign using a scraper tool. Be sure to press the vinyl down inside any cracks as you go along.
- Remove the transfer tape.
- Press the vinyl down well using the scraper tool.
- Measure and mark for locations for the holes to hold the pipe clamps. Use the mason jars to approximate location.
- Drill a hole in each pipe clamp large enough for your screws. Be sure to use an old piece of wood under the clamp to protect your surface.
- Then secure the pipe clamps to the panel with your screws.
- Add on your mason jars then tighten up the pipe clamps.
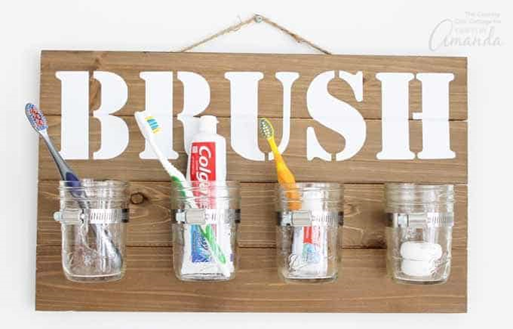
- Hang your mason jar bathroom organizer and add in bathroom essentials, such as toothbrushes, cotton balls, floss, etc.
Written by Heather Addis on January 1, 2020.
The holidays are officially over and it’s time to bring some organization into the home! If you love farmhouse style like I do, then you will definitely want to add this craft your project list. Multiple kids can sometimes lead to chaos on school mornings. Bring in some organization to shared spaces to help create drama free mornings!
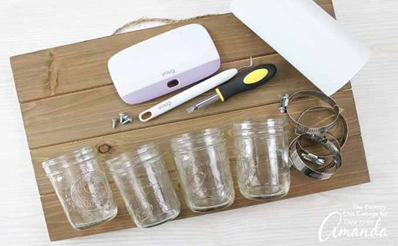
Materials:
Rustic wood panel
Mason jars
Pipe clamps
White vinyl
Transfer tape
Craft cutting machine
Weeding tools
Scraper
Screwdriver
Drill
Screws
Source(s):
https://craftsbyamanda.com/mason-jar-bathroom-organizer/